Showing posts with label Dessert. Show all posts

Wednesday, November 1, 2023

Marshmallows- Careful, you'll never again eat store bought!

Homemade marshmallows are so light, fluffy and flavourful, store bought, commercial marshmallows don't even come close.  Use them paired with chocolate and graham crackers, over a campfire; flavour them with a dusting of cocoa powder or coconut...

To make 36 medium or 16 large marshmallows.

Ingredients
2/3 cup     water, divided
3 (1/4 oz)  envelopes unflavoured gelatin
1 cup         granulated sugar
1 cup         light corn syrup
Pinch of kosher salt
1 tsp          vanilla extract
1 cup         confectioners' sugar, for dusting

Directions
Lightly oil the inside of an 8" by 8" pan with vegetable oil.  Generously coat with confectioners' sugar and set aside.

Pour 1/3 cup of the water into the bowl of a stand mixer.  Sprinkle the gelatin over the water, and let stand for about ten minutes, or until the gelatin has softened.

In a saucepan, off heat, combine the remaining 1/3 cup water and the granulated sugar, corn syrup and salt.  Place the pan over medium-high heat.  Clip a candy thermometer to the inside of the pan and make sure it does not touch the bottom.  Cook the mixture without stirring until it reaches 240 degrees F.  Brush down the sides of the pan with a pastry brush dipped in water, to gently wipe away any residual sugar crystals.  With the mixer on low speed, very carefully add the hot syrup to the softened gelatin.  Add the vanilla, increase the speed to medium-high and beat for eight to thirteen minutes until the mixture becomes very white, stiff and sticky.

Spread the mixture into the prepared pan using a lightly oiled spatula.  With wet hands, press the batter evenly into the corners of the pan.  Set aside for at least one hour, or until the mixture is firm and cool.

Sift the confectioners' sugar into a shallow dish or bowl.  Run a wet knife around the edge of the cooled pan to loosen the marshmallow sheet.  Remove the marshmallows from the pan.  Cut into 16 or 36 squares, wetting the knife often to keep it from sticking.  Toss each marshmallow in the confectioners' sugar until completely coated.

Storing your marshmallows: in a single layer or in layers separated by waxed paper.  They will keep for at least one month when stored airtight at moderate temperature.

Variations: substitute sifted unsweetened cocoa or toasted shredded coconut for the confectioners' sugar used to coat the marshmallows, or fold one cup finely chopped cacao nibs, toasted almonds, mini chocolate chips, dried cranberries or any combination thereof into the stiff marshmallow mixture before spreading.

2023- I finally mastered Agave, lime, tequila marshmallows and they are amazing.  Here’s how:
I double this recipe and substituted the corn syrup with agave syrup; the water for the hot syrup should now equal 2/3 of a cup, but, I used 1/3 water and 1/3 lime juice; the liquid for the gelatine should also be 2/3 water but I substituted 1/3 cup of water with  tequila.  I zested three limes and added the zest to the marshmallows about halfway through the mixing.  I cut the limes in half and very thinly sliced them to decorate the tops of the finished marshmallow pieces.   Voila and enjoy!

OH! And they are great roasted over a fire… Really, ask my neighbours!

Other variations:  sometimes substitute half the corn syrup with maple syrup; sometimes use 1/2 water and 1/2 fruit juice when making the syrup; sometimes add 1 tsp of lemon flavour or vanilla.

Saturday, October 30, 2021

Maple Pear Upside Down Cake

 I love Mark Bittman's recipes.  Delicious and perfect for the Fall overload of pears.  Note to self: I used a new springform pan and didn't realize the caramel had leaked out of the bottom of the pan until I removed the cake from the oven.  What to do?  Drizzled the warm cake with maple syrup.  And, the next time I bake this cake, I will use a different,"tried and true" pan- lol

To serve 8 to 10.

Caramelized Pear Gingerbread

 What to do with a surplus of pears?  Happens every Fall.  This recipe is from the LCBO's Food & Drink magazine. The recipes are well worth trying!

Classic soda gingerbread is topped with pears while caramel sauce enticingly drizzles down the sides. It is very rich in an English pudding-like manner-perfect fare as the days get shorter and pears are at peak ripeness.  This makes a dense cake with great ginger "y" notes.

Serves eight

Ingredients

Topping:

3 tbsp        unsalted butter
½ cup        lightly packed brown sugar
2 ripe         medium-size pears, soft but not mushy

Cake:

½ cup        molasses
½ cup        milk
1 egg
1 tbsp        finely grated fresh ginger
2¼ cups    all-purpose flour
¼ cup        granulated sugar
1 tsp          baking soda
¼ tsp         salt
¼ cup        butter, melted

Directions:

Preheat oven to 350ºF (180ºC).

To make topping, put butter in a 9-inch (23-cm) round cake pan and place in preheated oven for 3 to 4 minutes or until butter is melted. Sprinkle with brown sugar. Peel pears, core and thinly slice into wedges. Arrange decoratively over brown sugar, overlapping as needed.

To make cake, whisk molasses with milk, egg and ginger until blended. Mix flour with sugar, soda and salt; add molasses mixture and melted butter. Stir until almost smooth (batter will be thick). Spread over pears. Level top.

Immediately bake in centre of preheated oven for 45 minutes or until edges of cake pull away from sides and a cake tester inserted into the centre comes out clean. Remove from oven; run a knife around cake edge.

Place a large plate with sides over cake top. Together turn upside down; cake will fall onto the plate. Replace any pears that stick to pan; run a rubber spatula around bottom to get last of caramel sauce onto cake. Serve warm with crème anglais or lightly whipped cream.

**I made this recipe using four small springform pans (3") and one six inch pan.  I adjusted the cooking times accordingly:

For the three inch cakes, first 15 minutes, then another 10 minutes to cook the middle of the cakes.

For the six inch cake, about 35 minutes.  Be sure to check for doneness when you take out of the oven.


Monday, May 17, 2021

Tiramisu

Tiramisu, a classic, delicious Italian dessert is easy to make and a perfect end to that fancy dinner.  Be sure to use the best quality ingredients- there are few, and they need to be great.

I like to use "build" my tiramisu in small dishes or containers- even canning jars.  They can be frozen individually and they prevent me from eating way too much at a time- you know, "just trimming the edges." 

To make approximately six to eight servings.

Wednesday, January 1, 2020

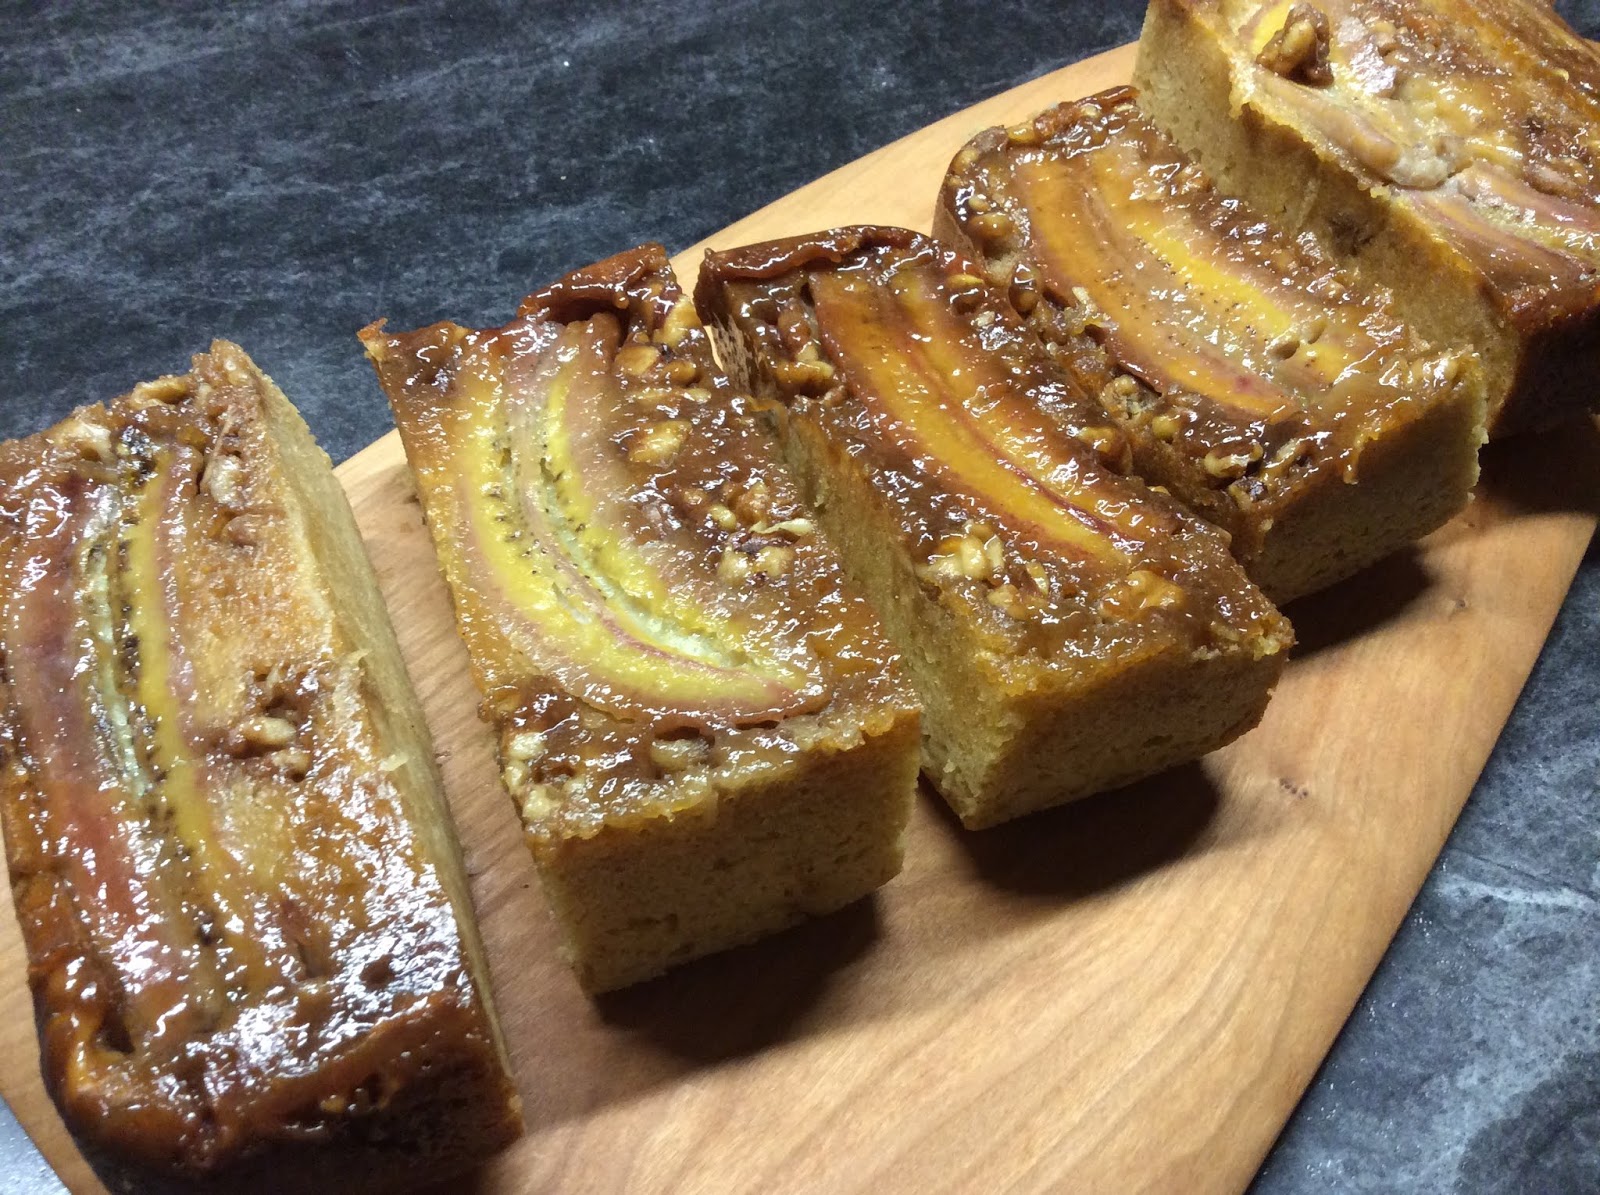
Going Bananas- Banana Upside Down Cake with Walnuts and Coconut

An easy, quick cake sure to become your family's favourite.  I always have frozen, ripe bananas ready for baking.  This weekend, I happily baked two banana breads and this very delicious upside-down cake- move over pineapple, banana is now king!

Unless I am baking for an upcoming dinner, I like to cut up my cakes and freeze in small portions.  If I thaw a whole cake, I  know that I will eat much more cake than is good for me.  But, a little piece is just fine and makes me feel virtuous and reasonable. HA!

This is another great recipe from Bake from Scratch, a great source of well-written and enticing recipes.  Highly recommended.

Cutting up my cake in small (maybe not so small) pieces for the freezer,
ready to snack on.
To make one nine-inch square cake

Saturday, January 12, 2019

Mandarin Orange Curd- It's all about the citrus

I love my Kitchenaid Precise heat mixing bowl.  While it is working heating and stirring my curd mixture, I am sitting in the living room blogging away happily.  Perfect!


Mandarin orange curd
 I had quite a few aging mandarin oranges needing to be useful- time to make a curd.  I juiced the mandarins and zesting and juiced one lemon to add more flavour.  The results were delicious.

To make 1 1/2 liters.

More Citrus- Meyer Lemon Curd

Still "playing" with the new Kitchenaid precise heat mixing bowl.  I tweeked the method on this one and it came out thicker than the last one.  It sure makes things easy when I don't have to stand beside the pot to stir constantly.  Multitasking- nice...

Two curds- Orange Blossom lemon curd and Meyer lemon curd.

Meyer lemons are available in Ottawa stores around Christmas, into January and maybe February.  I love their bright colour and flavour.

To make approximately 750 ml.

It's Citrus Time- Orange Blossom Lemon Curd

It's time for citrus!
I have a new kitchen tool/toy!  It's amazing... a Kitchenaid precise heat mixing bowl.  Let the experiments begin!  Today was all about curds: Orange blossom lemon curd and Meyer lemon curd.

 Making curd can be a workout with all the stirring involved.  The heated mixing bowl puts an end to all of that.  I just set the temperature, set the whisk and it does it all.  I did adapt recipes for the new "method" and, I have to say, they worked out wonderfully.

Sunshine to add warmth to the minus 20C weather outside.  Baby it's cold outside! :-)
The Orange blossom lemon curd recipe was adapted from The Preservation Pantry.

This recipe makes 750ml of delicious curd.

Monday, January 1, 2018

Oatmeal Banana Bread -

I have a great banana bread recipe, but I wanted to make it even healthier- so I added toasted oatmeal, maple syrup instead of sugar, and fresh blueberries.  Alton Brown's recipe introduced me to toasting oatmeal and I added my riffs... Enjoy!


Sunday, April 30, 2017

Siempre Tequila Marshmallows... Perfect for Cinco de Mayo!

What does Gourmet Jo bring to a Cinco de Mayo Celebration?  Siempre marshmallows, of course!


But, how do you serve marshmallows- beautiful, sticky, gooey, Siempre and lime infused treats, to fifty well-heeled guests?


These simple, one bite cups did the trick.  Siempre infused slices of lime are strategically placed in each clear cup, ready to receive a spoonful of Heavenly marshmallows.

A little salty, a little sweet, a touch of lime and a healthy "glug" of Siempre Tequila...


Beyond Heavenly!

Saturday, March 5, 2016

A Gujarati Specialty (and a great dessert)- Fada Lapsi

Where is Gujarati, you might ask?  Well, it is India's westernmost state, famous for its textiles.  I had the absolute pleasure of visiting a few villages near Bhuj, on the edge of the Kutch desert, all providing opportunities to explore the world of textiles- families of weavers, block printers and dyers- fabulous fabrics to see, feel and purchase.

You don't need a fancy kitchen to make this dish!  Cooking outdoors, over a small fire... 
We were invited for lunch at one of the villages.  I had the pleasure of spending time with the ladies as they prepared our food.  One of the dishes on the menu was daliya lapsi, a famous Gujarati dessert usually prepared for festivals and other special occasions.  This recipe combines "broken wheat" (that would be cracked wheat in Canada) with fragrant cardamom and a few other ingredients.  We certainly enjoyed it!  Here is my version of this dish.


Tuesday, January 5, 2016

Maida Heatter's Eight Hour Cheesecake- my way

I love making cheesecakes and I especially love making Maida's cakes.  Her recipes are exacting and they always taste amazing.  But the thing is, I prefer making individual cakes- I can freeze small portions and individualize the servings.  It's a perfect gluten-free recipe if you omit the graham cracker crust...  The small cakes were made in 250ml wide mouth canning jars.

This recipe makes 15 cakes in jars.

Wednesday, October 8, 2014

Torta di Zucca eh!

In Italy, that's pumpkin cake with pine nuts and apricots; in Canada, I make it with a twist: maple syrup, walnuts and dried cranberries.  In either country, it's moist, fragrant and easy to bake. Delicious!

My recipe is a twist on the one provided by Eliza Green in her great cookbook "Starting with Ingredient Baking".  I made this cake for an office bake sale and fundraiser.

Using a nine-inch ring pan, this cake will serve 10 to 12.

Friday, June 13, 2014

Louise's Tiramisu- It has stood the test of time- Always a Hit!

From Louise...

The first time I had this I was with Wilma at a restaurant at the corner of Dalhousie and Clarence (I think). They put the mixture on a plate and put the lady fingers around it. It was very good (the lady fingers stayed crisp) and that is the way I served this for years. But now I prefer doing it the way I've outlined below. 

Sunday, June 1, 2014

Banana Yogourt Cupcakes

Sorry, no picture.  We ate them all!  I'll try again next time.

Quick to make- and, I used a sugar substitute, Xyla, so my diabetic friends could indulge.  You could use brown sugar.

This recipe makes 12 cupcakes.

Monday, May 19, 2014

These are Heavenly! Marshmallows...

Homemade marshmallows... once you've made these easy treats, you'll never, ever be tempted to buy the grocery store variety.  Not even close!  This is a great project to do with kids...

I found the basic recipe in a Gourmet magazine.  After making up a batch of the marshmallow mixture, I "consulted" with my granddaughter for the flavours.  Here is what we decided: plain with toasted coconut coating, then a cocoa covered, nutella swizzled variety (you have to try this one) and a colourful purple variety (food coloring swirled through the marshmallow) with a plain sugar coating.  These marshmallows are amazingly light, fluffy, exactly what a real marshmallow should be.  All of our varieties were amazing, especially the nutella one!


Go ahead and try our varieties then experiment.  I bet you can come up with more favourites.

This recipe makes approximately 3 dozen marshmallows.

Friday, April 18, 2014

We all Scream for Ice Cream- that's maple banana ice cream with strawberries and chocolate chips

This is what you get when you consult a three year old!  Aaliyah has great taste!  I proposed maple ice cream and she added the rest... banana, strawberries, chocolate chips.

Homemade ice cream is so much healthier and you can make it to order.  It's well worth investing in a good ice cream maker... I like to make about 1 - 1 1/2 litres and finish it in small molds.  When I want a sweet treat, I need only take out a small portion and avoid temptation.

Here is the recipe for about 1.5 litres.

Tuesday, August 13, 2013

The Best Banana Bread!

I just ate the most wonderful banana bread!  Light and nutty with lots of banana flavour.  I baked mini breads so I can limit my portions to just one, at a time.  Perfect!

I've included some healthy ingredients to my recipe: flax seeds, yogourt and toasted nuts.  The usual butter is replaced by healthier grapeseed oil.

This recipe will make one regular size bread or about 10 mini breads.

Wednesday, June 12, 2013

Pop Tarts- Time to get back to basics and real goodness!

I remember when Pop Tarts first hit the grocery store shelves.  They became a kid "staple" for breakfast and snacks... I guess those were the days when ingredients and real nutrition didn't matter so much.  Actually, mom was a great home cook, so perhaps a little junk food wasn't so bad.

These fancy modern processed "treats" had simpler, more flavourful and, dare I say, healthier ancestors.  This recipe was developed by Hedy Goldsmith, an amazing baker whose recipes I am looking forward to trying out.  She gives her Pop T's an adult spin.


For 16 pop tarts.

Wednesday, May 8, 2013

They are Delicious and Vegan and Gluten Free! Pecan Cinnamon Rolls

These wonderful, cinnamon rolls are perfect for pecan lovers.  The dough is made with an assortment of healthy flours AND leaves out the gluten and the dairy.  If you can't find a particular ingredient for this recipe, check out the Internet for substitutions (including the right quantities for substitutes).  They don't look like the puffy, gooey sticky buns/rolls made with all the regular ingredients.  Jenny was very creative and her rolls taste great while being oh so healthy.  Definitely worth trying.


A few things to remember: this dough is very soft but if the dough doesn't come together for you, add a little more flour.  It's important to use the parchment paper to roll the dough, sushi style and it's really important to coat the parchment paper with extra rice flour.  I use my trusty rolling pin (coated with rice flour) to gently roll out the dough.  Because there is no gluten, don't expect the rolls to puff out like their cousins, but they will kind of rise/puff.  The texture is denser, rich and redolent of pecans and maple.

This recipe is adapted from a book entitled Gluten-Free and Vegan Bread by Jennifer Katzinger.  Thanks Jenn!

To make 10 rolls.